

This document aims to explain how to use the Otter Unit Test Framework. You will notice that this tool is quite similar to the JUnit Framework. Therefore, whoever is accustomed with JUnit will have no problem adapting to this framework.
This version has no Visual Studio Plug-in. The reason is simple: since MS Visual Studio now comes with a Unit Testing Framework, Otter Unit Test Framework serves no purpose for this IDE. However, the Express editions (Web Developer, and C# Developer) have no Unit Testing Framework. Therefore, this version and the next ones will focus on these IDEs. Since they provide no Plug-in support, no such tool will be implemented. Therefore, the only manner the Otter Unit Test Framework is to be executed is by creating a Window App Project in the Solution, as it is described next.
Moreover, this version was complied using Microsoft .NET Framework 4.0, so new APIs and standards of this version can be used accordingly.
Here is how you put this framework to work: create a Windows Application within the solution being tested. In this application, register the Test classes and execute the framework. This is done programmatically.
By doing so, all solution context is used since the tests are placed as a new application in the solution. As a drawback, one has to program the tests insertion in the framework and its execution. This however, is a quite easy to do, as described further in this material. Moreover, Web Applications will not have its container contextualized when the tests are run. Thus, the Tests will not have access to Session, Requests or things of this kind. See it like that: the application will be executed as if it were a Desktop app.
Now, a detailed explanation on how to use the framework will be given. In order to ease the learning process, the explanation will be based on an small example which you can get by clicking here.
Go to the sourceforge project web site, and download the Otter Unit Test Framework version 00.04.
As mentioned before, in order run the application, have to create a Windows Application project, programmatically add the Test classes to the framework and launch it. Here both manners are presented in details.
Follow the steps below in order to add a Windows Application Solution to your application. Note that the sample application (OtterUsageSample) already had this implemented as its only project.
Here the OterUsageSample application will be used to demonstrate the procedure. In order to add the OtterUnitTestFramework.dll as a reference to the application, right-click in the OtterUsageSample application and select Add Reference.... Then select the Browse tab and fetch the OtterUnitTestFramework.dll. In the sample application you can find the OtterUnitTestFramework.dll at the lib directory. In the .zip file you downloaded from Sourceforge you can find the OtterUnitTestFramework.dll at: ./bin/dll.
Now that the framework is set up, it is time to create a Test class. In the sample application, it was created in the directory test and was called TestCaseSample.cs. The implementation is shown in Figure 1.
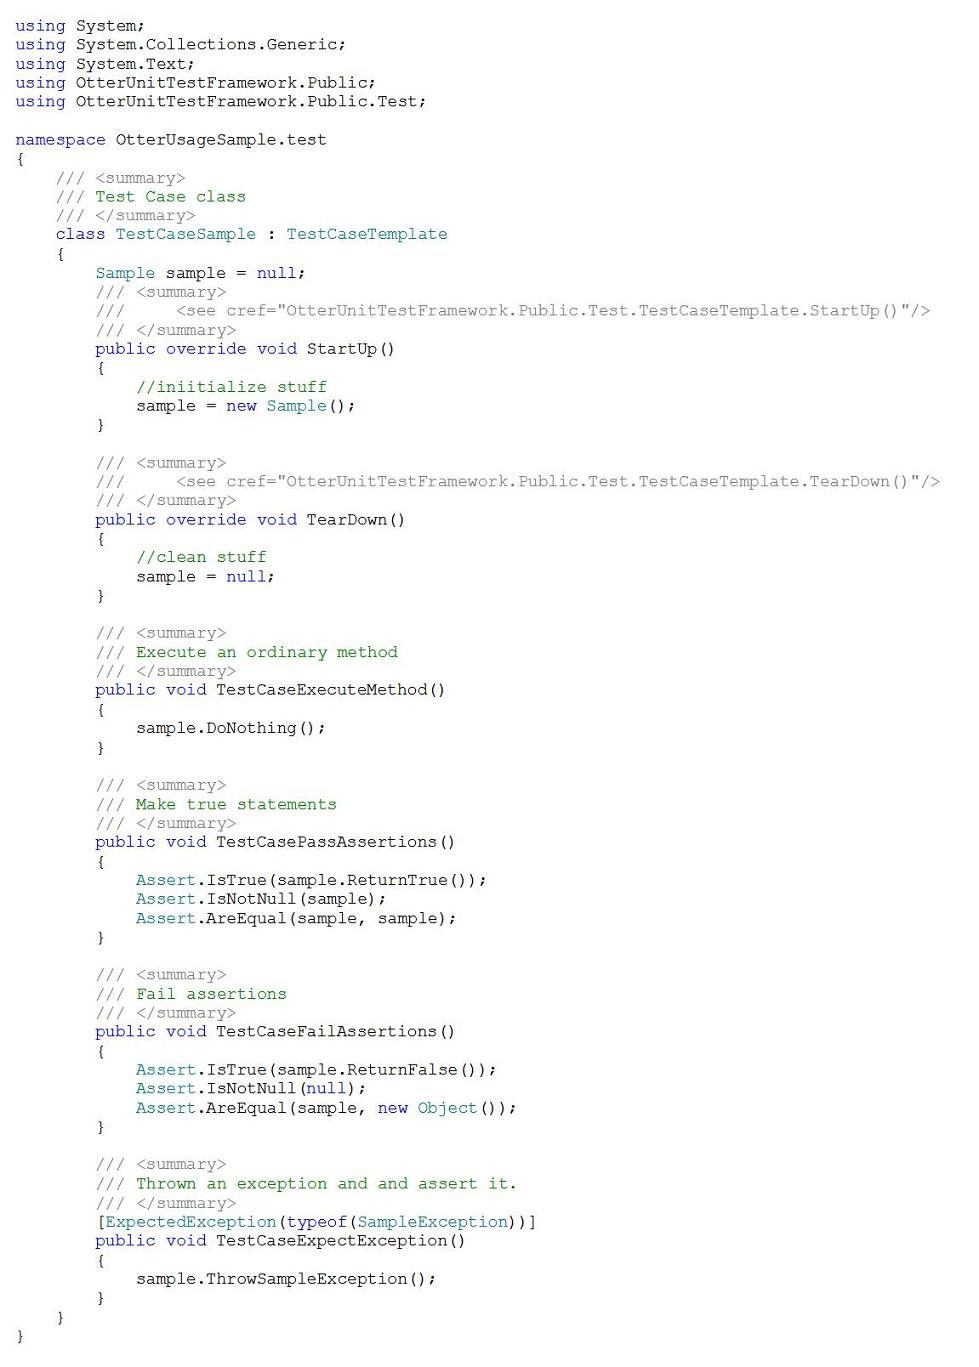
Note that the class TestCaseSample implements OtterUnitTestFramework.Public.Test.TestCaseTemplate. By doing so, the implemented class is considered a Test Case class. After that, test methods are needed. In order to create them, make methods which follow the rules below:
Note that there is nothing unusual about the implemented methods (tester-methods). They simply call other methods - the ones to be tested. Also observe that OtterUnitTestFramework.Public.Assert class calls several static methods. They serve the purpose of testing expressions. For instance, if you call Assert.IsTrue(EXPRESSION> and the tested EXPRESSION is false, the tester-method will fail (otherwise it will succeed). This is how methods, or their results are tested, they are evaluated as an expression.
See in Figure 1 that the method TestCaseExecuteMethod runs the method DoNothing of the class Sample. In case no exception is thrown, the test will pass, otherwise it will fail. Note that the method DoNothing was tested.
Again, in Figure 1 the method TestCasePassAssertions makes several assertions using Assert methods. In case all of them pass, the test will succeed, otherwise it will fail. In this case, all evaluated expressions are successful resulting in a tester-method which has passed. Again, observe that methods (and object values) called by the Assert methods were tested.
On the other hand, the method TestCaseFailAssertions executes only faulty assertions. This obviously will result in a test failure.
An interesting tester-method is the TestCaseExpectException. Its goal is to test a method which throws an exception, more specifically, SampleException. In case SampleException is thrown the method passes, otherwise it fails. Thus, in this case the test is successful.
You should have observed that the there are two methods which do not follow the tester-methods rules - they are the StartUp and TearDown methods. You must have also perceived that they are overridden methods. They have the following purpose.
Note that in the example of Figure 1 the Startup method always creates an instance of Sample whereas the TearDown set it to null. In real-life-testing-situations, these methods are useful for opening and closing resources which are used in every tester-method.
Register all Test classes in the framework and then execute it. This is pretty straightforward as displayed in Figure 2.
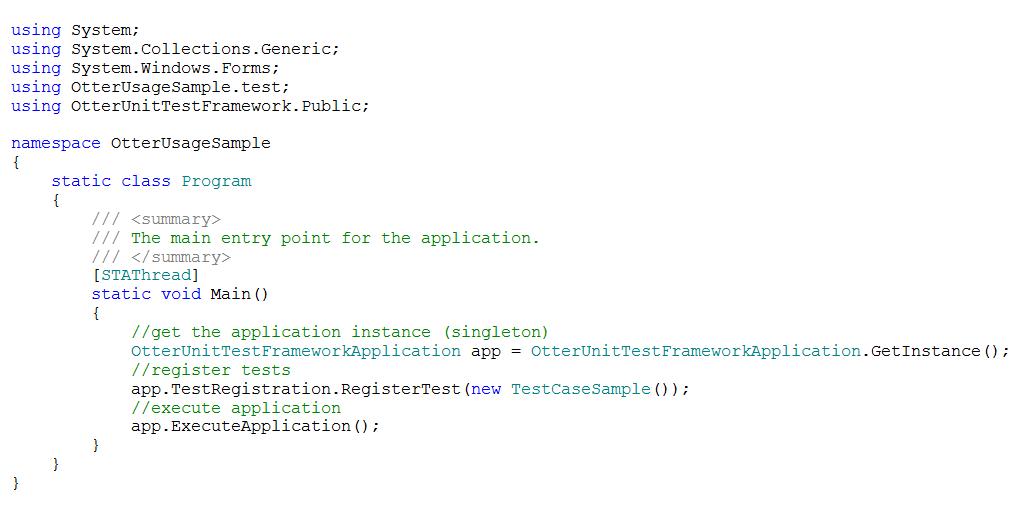
In Figure 2 app instance was retrieved from a Factory (singleton element). Also, see that the Test class were registered simply by using the property TestRegistration which has the register method RegisterTest. Finally, the application was executed using the method ExecuteApplication. Note that these steps were taken in the Main method.
Now you need to run the application. In order to do so, right-click on the OtterUsageSample project, click Debug and Start new instance. This will launch the Otter Unit Test Framework. The explanation on how to interact with the application is given in the next topic.
In this session it is described how to use the Otter Unit Test Framework. You will notice that the interface is quite intuitive and its usage is quite simple. Figure 3 shows the application.
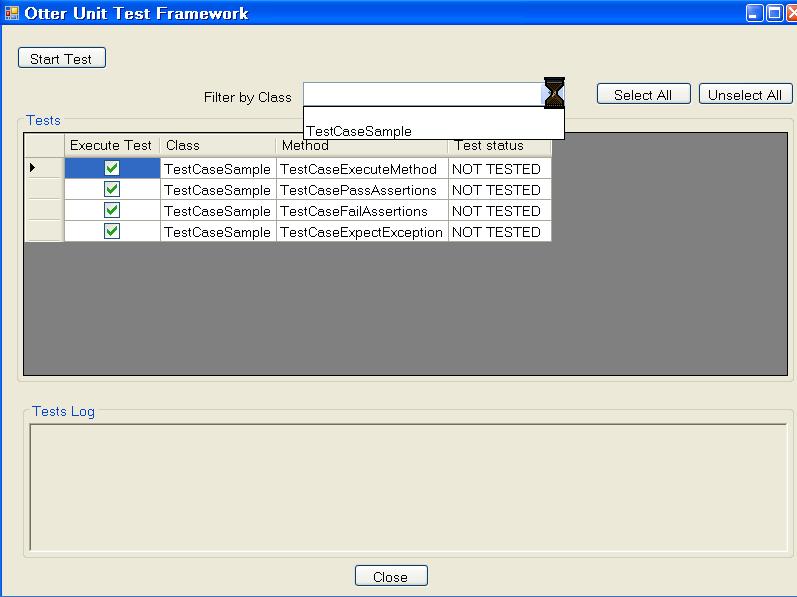
As you can see in Figure 3, you have the option of selecting and unselecting the tests to be run by checking or unchecking the check boxes for each test, respectively. Also, note that you can check and uncheck all tests by clinking "Select All" or "Unselect All" respectively. In addition to that, you can see in each row of the shown table: the test class, class method and the test status. Note the list box which is open, displaying the Test class name. In case you wish to execute tests related only to one class, select it, if you want to run tests from all classes, choose the empty option (first one). Finally, in order to start the tests, click "Start Test" and should you want to quit the framework, click "Close".
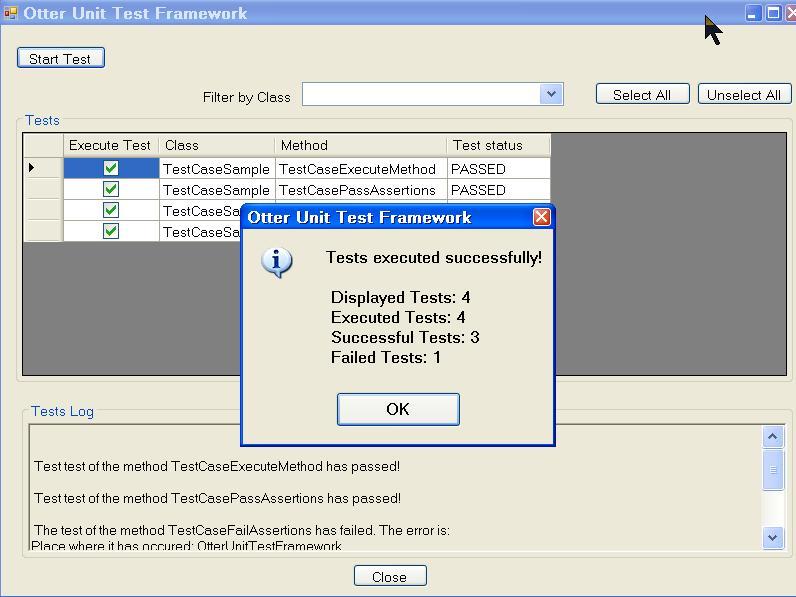
After a executing the test, something resembling Figure 4 is displayed. Observe that the statistics of the tests execution are listed in the OK message. In Figure 5, you can see the results of the tests execution without the OK message. Note that are tests which have passed and others which have not. All of them represent the ones in the sample application mentioned before.
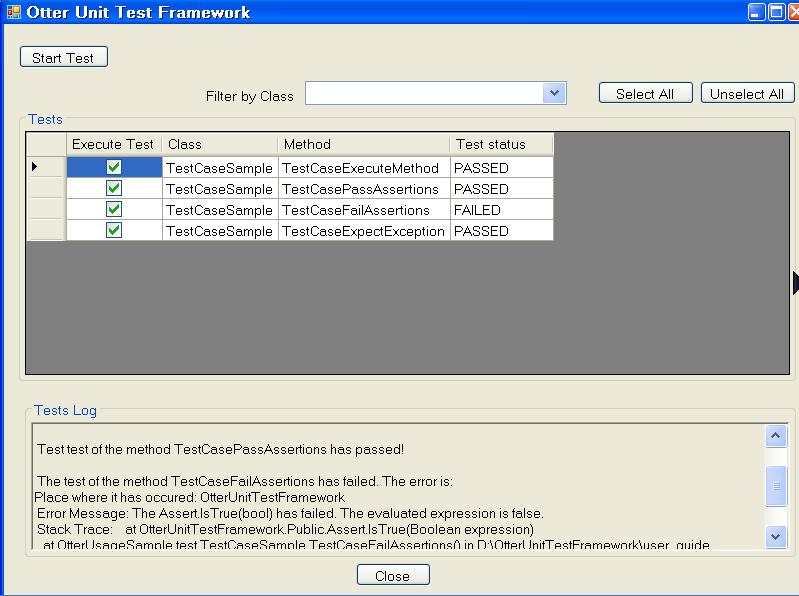
In Figure 5 you can also see a log in the middle-below part of the panel. This log shows all information regarding tests execution (i.e. tests which have passed, tests which have not passed and the reason for that).
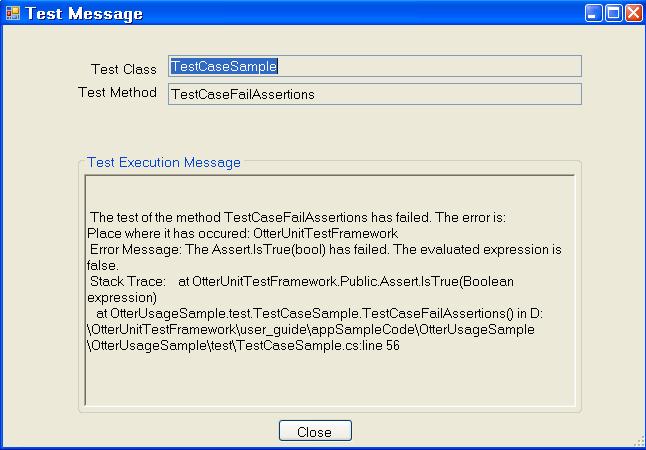
Another way to see test messages is the following: double-click the row of a certain executed test and a screen like Figure 6 is displayed.
This covers framework functionalities. As you may have noticed, it is quite straightforward to use the Otter Unit Test Framework which is the main goal of this framework: to be simple. Next, will be covered all Assert methods and the possibilities for the ExpectedException tag.
Assert methods basically test methods and their results by applying a condition (e.g.: is true, is false, is null, etc.). Below are all Assert methods and their usage.
A common situation of testing is to verify whether a method throws an exception. In this framework this can be verified with the aid of the method tag ExpectedException. Suppose you have the method ThrowSampleException and in order to successfully test this method, the SampleException must be thrown. Therefore, to program this test, call ThrowSampleException within the tester-method and mark it (the tester-method) with the tag ExpectedException(typeof(SampleException) as shown in Figure 1. By doing this, the test will pass in case an exception of type (typeof) SampleException is thrown and fail otherwise.
One important observation about the ExpectedException tag the following. Consider the example just given above. In case an exception which has inherited from SampleException was thrown, the test would still have succeeded because inheritance is considered when using the ExpectedException tag.
You should also be aware that you can enter several exceptions within the ExpectedException tag, For instance, if you make a tester-method with the following tag: ExpectedException(new Type[] { typeof(OtherException), typeof(SampleException) }), then if either OtherException, SampleException or any inherited exception were thrown, the test would be successful, otherwise it would fail.
It is not possible to use this framework with Web Site Applications, because no .DLL is created. Therefore, to unit test Web Applications, create Web Applications instead of Web Site ones. Note that when testing them, no Context such as: Session, Requests and so on are, provided.
If you wish to send any comments, suggestions, etc., please feel free to do so by e-mail (link below).
